Even though we all regularly drink water from bottles, learning how to draw water bottles can be challenging.
Thankfully, our guide will make it much simpler.
This step-by-step tutorial demonstrates how to draw a bottle of water with simple-to-understand illustrated examples and short drawing instructions. Let’s start.
Other Posts You Might Like: How To Wrap A Bottle?
Table of Contents
Steps To Draw A Water Bottle
Step 1: Draw The Top Of The Bottle Of Water
Draw the neck and shoulders of the bottle, as well as the top portion of the bottle, first. Keep in mind that the neck will also have a ring section and a cap above it (added in subsequent steps), so avoid making it too long.
You could also mark the center of the area where you want the bottle by drawing a thin pencil centerline (blue in the example). If both of its halves are the same width, you can check using this line. You may keep it through step five if you decide to draw it.
Step 2: Draw The Sides Of The Bottle
Draw two straight lines down from the shoulders to form the bottle’s sides. Try to avoid making them too long or too short as they will largely determine the height of the bottle.
Step 3: Draw The Bottom Of The Bottle
Add the bottom last, as in the example. It should be drawn with rounded corners and a smooth curve.
Step 4: Draw The Neck “ring”
The “ring” section that water bottles typically have should be added to the top of the bottle. Make it slightly wider than the neck, but fairly narrow overall.
Step 5: Draw The Cap
Add the cap to the bottle’s top last. Give it rounded edges and a very slight top curve. With that, you should have a basic understanding of the bottle’s structure and all of its constituent parts.
You can now remove the center line if you chose to do so in step one.
Step 6: Draw The Water
In order to complete this straightforward step, mark the water level in the bottle by drawing a straight horizontal line just below the neck.
Step 7: Draw The Label & Finish The Line Drawing
The label should be placed roughly in the middle of the bottle (vertically). It’s two curved lines, please. One that is just barely curved for the top and another that is more curved for the bottom. Once finished, you ought to have a complete drawing of the water bottle’s outline.
At this point, make sure you are satisfied with how everything looks and make any necessary corrections. After that, trace over your drawing with a black pen, marker, or darker pencil lines.
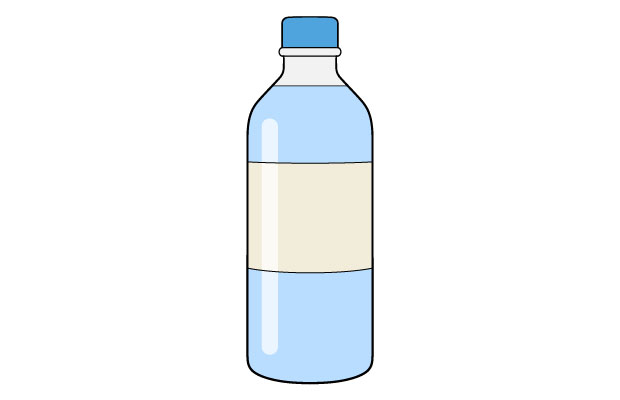
Step 8: Color The Bottle Of Water
The bottle can be colored with light blue water, a grey bottle, a blue lid, and a light yellow or brown label. Any type of medium is acceptable, as is a combination of several. If you want a darker blue for the lid and a lighter blue for the water, for instance, use a marker on the lid and a pencil on the water, respectively.
As seen in the example, you can (optionally) leave a highlight running down the side of the bottle. If you decide to add it, lightly outline it in pencil first before coloring. You can lightly go over it with blue for the areas over the water and yellow for the areas over the label if it seems a little too bright.
You should be done with the drawing once you’ve finished coloring.
Tips To Make Your Water Bottle Drawing Unique
As we provide some guidance for this water bottle drawing, feel free to let your imagination run wild!
Although we made a bottle that holds water for this guide, it might be amusing to show the bottle holding different liquids. You could convert this water bottle sketch into a soda bottle, for instance.
It might only involve changing the plastic parts’ color to something darker if you were to do this. Altering the label to match the one on your preferred soda brand is another option.
What other beverages can you consider using to replace this water bottle?
Including a background is yet another entertaining way to transform this water bottle drawing. There are so many enjoyable things you could do!
To keep athletes and players hydrated, water bottles are frequently used at sporting events. The creation of a background with a field or other sporting event could therefore be a good place to start!
What other places might you use as a background?
There are other foods and beverages you could enjoy in addition to your cool drink wherever you are.
Use a few of these to make your water bottle sketch even more eye-catching.
Fruits or possibly an energy bar could be among these. You can display what you would like with a nice bottle of water; it’s up to you!
Though it can be challenging, there are some art tools and techniques you can employ when rendering transparent surfaces in a 2D drawing. Use softer mediums to give the plastic on this water bottle the appearance of transparency.
You might find some colored pencils or even some watercolors among these. Putting something behind another object is a good way to demonstrate transparency.
This effect is made possible by the way the object will be distorted behind the plastic. What other drawing-related techniques do you have?
Conclusion
This tutorial demonstrates how to draw a straightforward bottle of water with the bare minimum of details to make it simpler to draw. The finished product can look quite nice while not being overly stylized.
Make sure to demonstrate your creative use of your own colors and details! We are excited to see what you do with it because there are so many creative ways you can use it.
If you have any additional queries, kindly leave a comment and let us know.
Read More: Can You Take Water Bottles On A Plane?